If you promote your brand using networks in addition to impact.com, you can experience circumstances where more than one solution takes credit for a conversion. This can lead to duplicate payouts.
With impact.com's Optimize reporting solution, you can track these additional networks within the impact.com platform and configure settings to control payout behavior to avoid duplicate payouts.
Within impact.com, these networks are configured as Media Sources.
 This feature is only available with the Optimize add-on. Click here to get the add-on!
impact.com has an extensive list of networks to help you get the most out of Optimize. The first step to set up network tracking is to find your network from our list.
From the left navigation bar, select
![[Optimize] v2](https://paligoapp-cdn-eu1.s3.eu-west-1.amazonaws.com/impact/attachments/f01cdffa431a4d75ff09c130b66974d4-1d8013c97bf236aaca056d801ce35308.svg) [Optimize] → Settings → Networks.
[Optimize] → Settings → Networks.In the top-right corner, select Create Media Source.
At the top of the screen, use the search bar to search for a network you use.
Set the Channel Type filter to Affiliate/CPA Network to find your network faster.
Select your network from the available network tiles.
If you do not see your network listed, select create a custom media source, found near the top of your screen.

You should only set up networks at this time. Media Sources, like GoogleAds, can be tracked in Optimize, but must be set up by impact.com. If you want to add media sources (e.g., Google SEO, Criteo, etc.), reach out to your CSM (or create a support ticket).
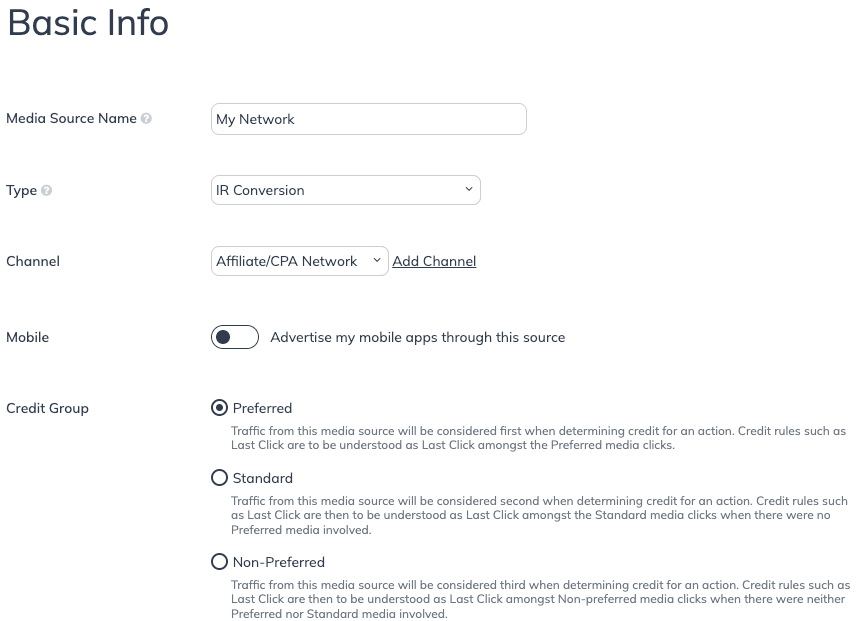
After you have found a network you use (or began creating a custom one), you must provide some basic information about that network. If you selected a network tile, some of these fields will be filled in for you.
Next to Media Source Name, update or fill in the network's name.
If you selected a network tile, this will already be provided, though you can update it to fit your reporting preferences.
Do not change the network's Type.
Next to Channel, select Affiliate/CPA Network from the drop-down menu.
Next to Mobile,
![[Toggle on]](https://paligoapp-cdn-eu1.s3.eu-west-1.amazonaws.com/impact/attachments/f01cdffa431a4d75ff09c130b66974d4-84d1224fd3bb6ba94b899febe2021eaa.svg) [Toggle off] Advertise my mobile apps through this source.
[Toggle off] Advertise my mobile apps through this source.Next to Credit Group, select to which credit group this network belongs.
Select Next.
If you selected a network tile in Step 1, you will see some general information specific to the network you selected.
In all cases, you will have 3 tracking options from which to select:
Tracking Option | Description |
Gateway Tracking | Track clicks from this source using our gateway links. |
Direct Tracking | Track clicks from this source with our Universal Tracking Tag. |
Promo Code Tracking | Track conversions from this source with assigned promo codes. |
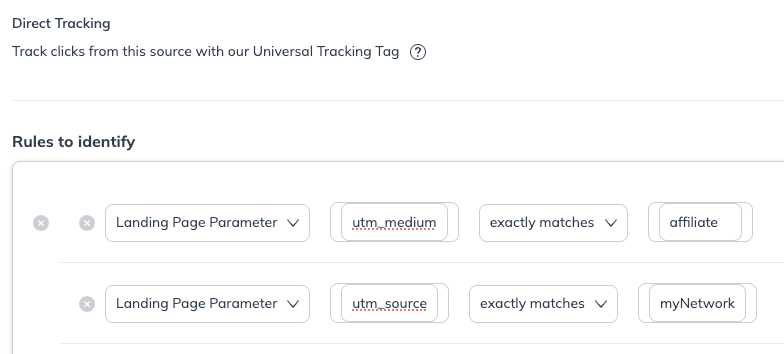
The most common tracking option used to track a network is Direct Tracking. Use this option if you want to configure Rules To Identify to identify traffic associated with this source. If, for example, your landing page URL is the following:
https://www.landingpage.com?utm_medium=affiliate&utm_source=myNetwork
You can configure your Rules To Identify as follows:
Rule Target | Rule Value 1 | Rule Logic | Rule Value 2 |
Landing Page Parameter |
| Exactly Matches |
|
AND | |||
Landing Page Parameter |
| Exactly Matches |
|
To configure Direct Tracking, switch the toggle on to reveal the Rule Builder. Then configure the appropriate rule options. You can read more about configuring Rules To Identify in the Channel Setup Strategy and Channel Setup Scenario articles. While these articles address setting up Optimize Channels, they are still applicable to setting up Rules To identify for Direct Tracking for your network.
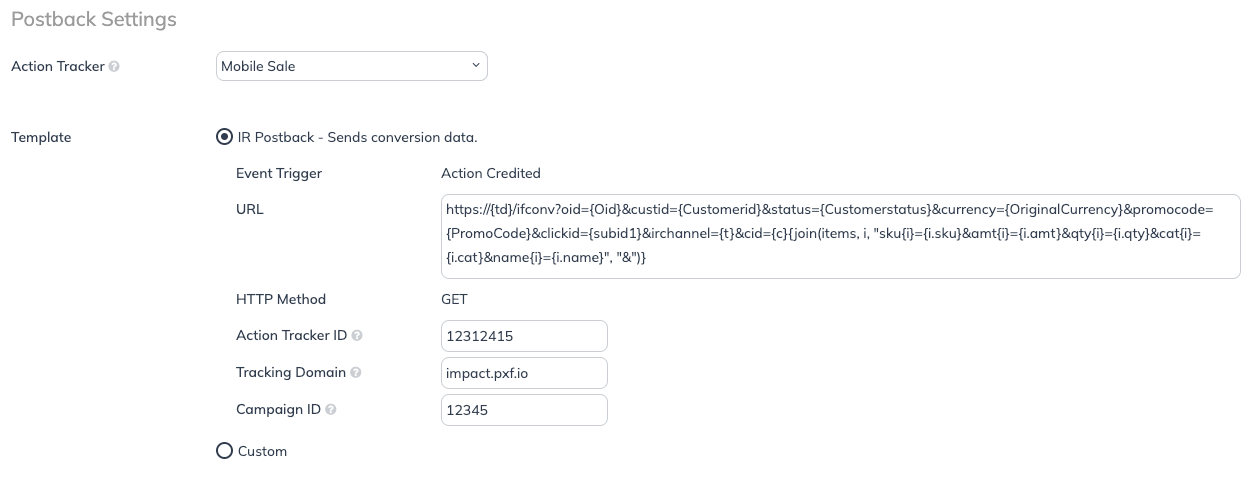
Decide if you want to use a piggyback pixel, which relies on tracking pixels planted on specific pages (like order confirmation pages) to load before they can fire, or postbacks, which call a postback URL to retrieve information about the action.
impact.com highly recommends utilizing postbacks, as piggyback pixels are more prone to false reports and tend to provide less accurate data. Also, if your program does not utilize pixel tracking, you cannot use piggyback pixels, as no tracking pixels exist to piggyback off of.
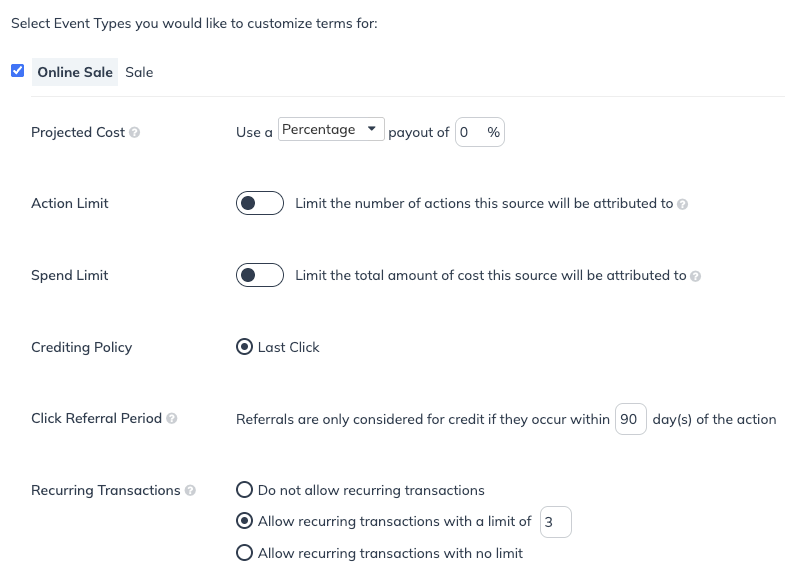
Finally, select the event type for which you want to set custom crediting terms. Remember that the network you are setting up can be credited for driving an action in the same way a partner managed within your impact.com program can be credited. However, the network will not receive a payout from your impact.compact program for driving those actions.
When your network is credited with driving an action, partners managed within your impact.com program will not receive credit for that same action. In this way, you will prevent duplicate payouts for the same action.
The crediting options give you control over how credit is allocated to your network. Think of the network you are configuring as essentially another partner that contributed to the customer journey. just as you can set action limits for impact.com partners, you can also set action limits for the network.