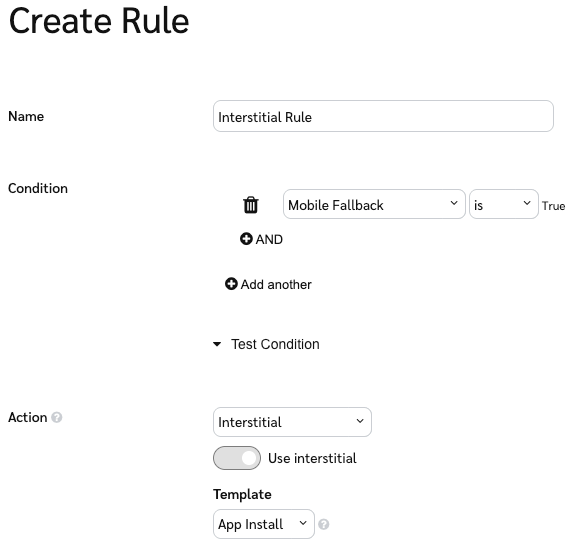
If you're using impact.com to serve mobile ads, you can also create a Blocking/Redirect rule that can route users to download your app via their device's app store, or choose to redirect to your mobile site.
When a user follows one of your ads' tracking links, they're routed to an interstitial page where they can choose to download your app from their device's app store, continue on to your website, or do nothing where they'll be automatically redirected to your website. impact.com will track these users and can attribute conversions (and/or installs) to your partners, depending on the events you're tracking.
Configure the interstitial
From the top navigation bar, select
[User profile] → Settings.
In the right-hand column under Technical, select Blocking & Redirect.
In the upper-right corner, select Configure rule.
Add a Name for your interstitial.
In the Condition section, use the dropdown to create a rule: Mobile Fallback is True.
In the Action section, use the dropdown to select Interstitial. This will redirect the user to the desired page, either based on the deep link specified by the partner or the ad or campaign landing page.
Under Template, use the dropdown to select App Install.
Customize your App Install interstitial—refer to the App Install interstitial setup below for additional help with each setup option. Use the Preview button to preview your customizations in a separate window.
Once you've completely setup your interstitial, select Save.

Refer to the table below for help with each of the options available for setting up an App Install interstitial.
Header text
A short phrase displayed on the interstitial in large type.
Header color
Hex code of the color for the header text.
Sub Header
A short phrase displayed directly underneath the header in smaller type.
Upload Logo
We recommend uploading your logomark instead of the full logo. The preferred format is SVG. If you choose to upload a PNG image instead, we recommend a transparent image with the larger of the two dimensions (width or height) measuring at least 500px. GIF, JPG, PNG, SVG File formats are supported. Maximum File size is 1 MB.
Upload Cover Image
Here you can upload a larger cover image to be displayed at the top of the interstitial page. GIF, JPG, PNG, SVG File formats are supported. Maximum File size is 1 MB.
Download Button Label
Word or phase displayed within the button that forwards the user to your app's install page.
Download Button Font Color
Hex code of the color for the font within the download button.
Download Button Background Color
Hex code of the color for the download button itself.
Continue Button Label
Word or phase displayed within the button that forwards the user to your website (not your app install page).
Continue Button Font Color
Hex code of the color for the font within the continue (to your website) button.
Auto Redirect Countdown (Optional)
Input the number of seconds before the user is automatically redirected to mobile web. Leave as blank or set to 0 to disable this option.
[Advanced] Body Text (Optional)
This is any text or html you would like to add to the interstitial. For example, you can set the below body to override the font family:
<style> @import url('https://fonts.googleapis.com/css2?family=Oswald&display=swap'); body {font-family: 'Oswald', sans-serif;}</style>
Once you have setup the interstitial, it’s time to test it. It’s easy to Preview the interstitial while getting it ready but you may also want to make sure that it shows up correctly when a tracking link is clicked.
Use a tracking link that matches the ad and interstitial rules. The tracking link needs to reference an Ad where Mobile Fallback is enabled and references the iOS and/or Android apps you setup in your account. The tracking link needs to also match any additional rules setup on the ad or partner side (i.e., any additional query strings your partners may add to the link).
If you have a mobile device handy, we recommend loading the link using an iOS or Android device, depending what you're testing. Alternatively, you can use Device Mode in Chrome DevTools to simulate a mobile device.
In Chrome, press ⌘ + Shift + C (macOS) or Ctrl + Shift + C (Windows, Linux) to open Chrome DevTools.
In the top toolbar next to Elements, select Toggle Device Toolbar, or press ⌘ + Shift + M (macOS) or Ctrl + Shift + M (Windows, Linux) to switch to a mobile view.

Load the tracking link in your browser to test the interstitial.
Once loaded, the interstitial should display based on the settings you configured for the ad and your blocking/redirect rules. Test that the Download and Continue links both work as expected. Note that the Continue option will append all query string parameters specified in your Gateway Tracking Settings.
For your Partners that are publishing mobile ad tracking links on their channels, we recommend that you instruct them to append the following query string parameters manually when available (i.e., after they copy the link from impact.com, they'll need to append these query strings manually to their unique tracking link).
| For app → app traffic, Google Advertising Identifier provided by Google Play services. (String) |
|
| For app → app traffic, Apple Identifier for Advertising |
|
| Landing page override, also known as a "deep link". If not specified, the landing page URL would be determined by either the ad or the campaign URL setup, respectively. In the case of deferred deep linking, this link is used to link the user to the relevant product following the install. The link specified after |
|