This article covers configuring your Creator Edit portal and is not relevant to the impact.com app. Contact us to learn more.
You can customize your creators' onboarding flow by editing the legal text they agree to when signing up, adding images to their onboarding steps, and adding a survey.
In the upper-right corner, select your <Name>
[Drop-down] → Admin.
From the left navigation menu, select Creator onboarding and update each of the following sections.
Below Legal terms text, select Edit to update the legal terms, then Save when you're done.
To remove the checkbox users must select before signing up,
[Toggle off] Disable agree to sign up checkbox.
If toggled off, select Edit to update the Agree to sign up CTA Text button, then select Save.
To display the checkbox,
[Toggle on] Enable agree to sign up checkbox.
To edit the legal term links, select Edit in the Actions column for each link, update the following information, and then select Submit:
Field
Description
Display name
The link text.
Default link
The portal's default URL slug for the agreement terms.
Override link
An external link that overrides the portal's default URL for the agreement terms.
Position
Where in the legal terms paragraph the link is located, 0 being the first link.
Active
Hide or display the agreement link.
You can update or remove the image of each onboarding step.
Select Edit for each step.
Select Upload to update the image. See the image specifications:
File format: jpg or png
Resolution: 72 PPI
Aspect ratio: 1:1
Select
[Delete image] to remove the image.
Optionally, update or add alternative text for the image.
Select Submit.
For the Login screen:
Select Edit.
Select Upload to update the image.
Optionally, update or add alternative text for the image.
Select Submit.
For the Pending state screen:
The pending state screen shows the message creators will see when they are done signing up.
You can add a survey to the onboarding flow or Pending state screen after a creator applies to your program. The survey can be used to collect more information about the creator during onboarding or while they wait for their application to be processed.
Create a survey in the impact.com app.
Find and copy the survey's ID.
Get your survey's IDFrom the left navigation menu, select
[Engage] → Partners → Surveys.
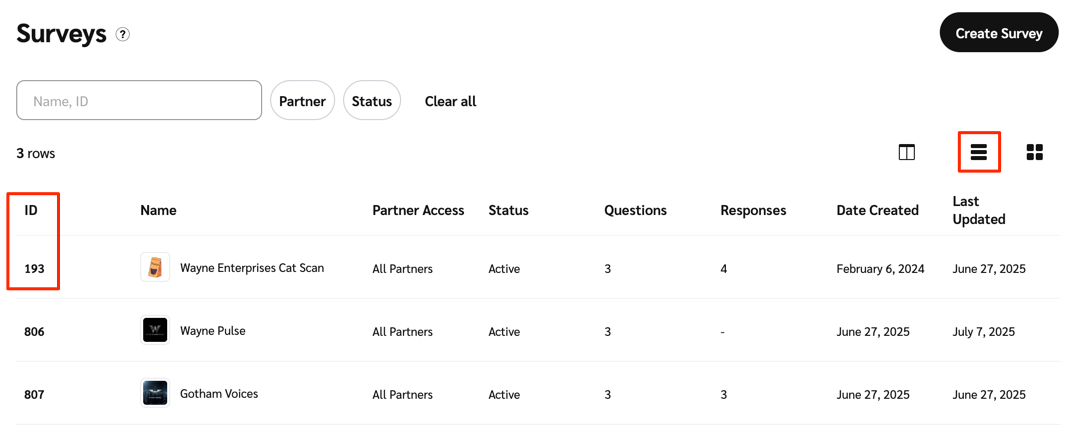
Ensure you have the
[List view] selected.
Find the survey you want to add, then copy the ID in the ID column.

Navigate back to your Creator Edit portal.
For onboarding surveys: Below the Onboarding survey id section, select Edit, paste your survey's ID, and select Save.

For pending state surveys: Below the Dashboard survey id section, select Edit, paste your survey's ID, and select Save.
