Your program is initially set up with default versions of program emails to get you up and running as quickly as possible. These default versions are loaded with generic images and messaging to convey the essence of the email. We recommend tailoring your program emails to ensure the information is relevant to your program and product.
See our doc on merge tags for information on how to include participant-specific details in your emails.
You will have at least one program email created when you are setting up your program rules. We recommend editing existing program emails and only creating a new one if needed.
From the left navigation menu, select
[Engage] → Content.
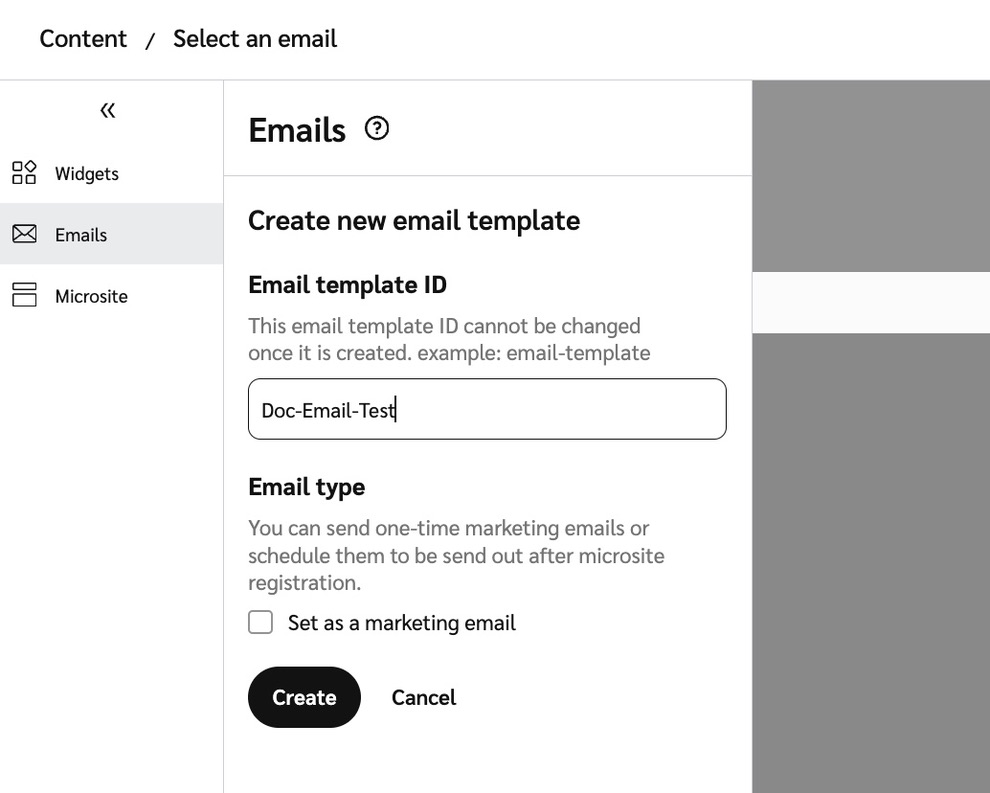
In the Emails card, select Create new or Edit emails to edit existing templates.
If you are creating a new template, select Create a new email template and enter a short, descriptive email template ID (e.g., Acme Advocates) to identify the email. Use this ID to identify the email when setting up your program rules.

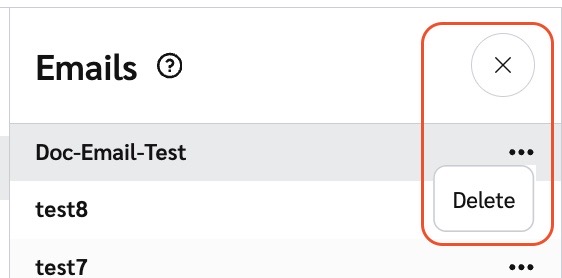
Select
[More] to delete a template.
Select
![[Exit icon]](https://paligoapp-cdn-eu1.s3.eu-west-1.amazonaws.com/impact/attachments/f01cdffa431a4d75ff09c130b66974d4-6b8870ddf0980d012485043e0aacc26e.png) [Exit icon] to minimize the side menu.
[Exit icon] to minimize the side menu.
Before using the editor, select Edit to fill in the required Contact Information at the top of your screen.
Enter the From Name by adding a static name that displays on the email, e.g., Acme Advocates.
Enter a From address from which the custom domain of the email originates.
If you want to adjust the From email address, you will need to adjust your settings to ensure that our system is sending authentic emails on your behalf. To use a domain that you own for the From Address, you must set up a domain from the Settings page.
Enter a BCC to send a copy of the email.
Enter a Subject for the email.
Select Done to save this information.
Next, proceed to using the editor.
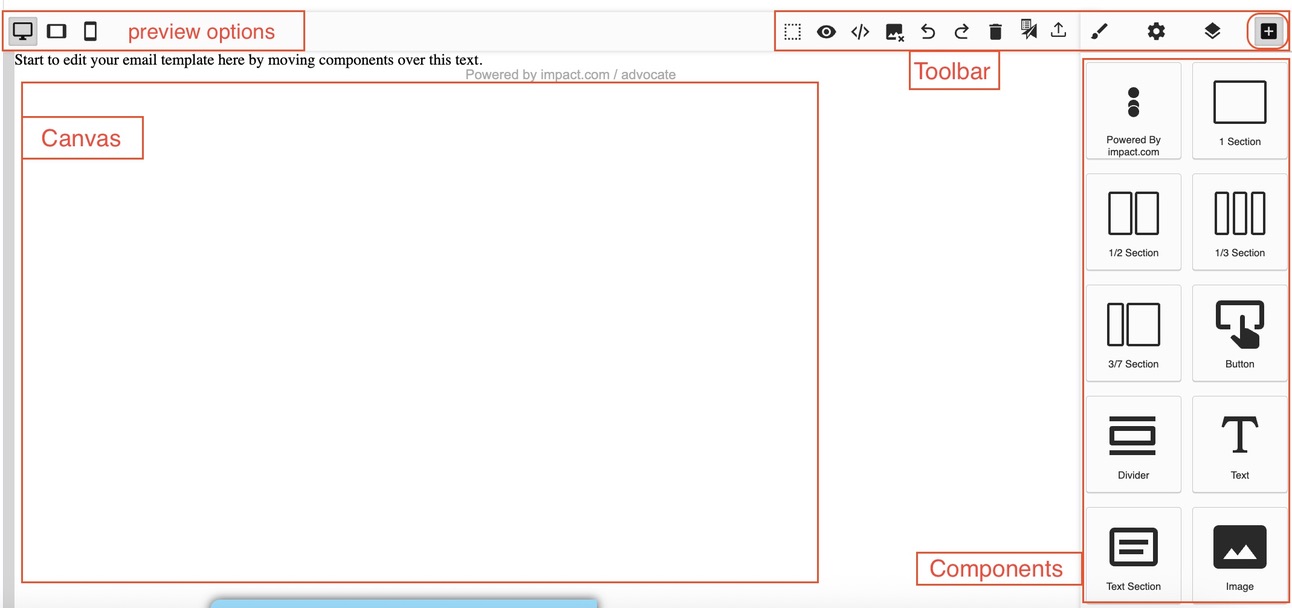
All of the images, text, and links in the email are set into individual components that make up the structure of the email. These components are the building blocks of the email.

Select
[Open Blocks] to choose a new component.
Select and drag the component into the area of the email where you want the component to appear. A green bar will appear in the email to help you place the new component in your email.
Optionally, adjust the component’s content or appearance using the toolbar on the right.
Double-click your new component.
Select
[Edit] in the toolbar on the right.
If you added a text component, then click the Typography
[Drop-down menu] and change the formatting.
Save your changes.
The email editor does not autosave changes. Make sure to select Save at the top-right of the screen. If you’ve made an error, you can leave the editor and the changes will not be saved.
Email copy is divided into text components that are managed in different sections of the email.
Add a new text component or double-click to highlight an existing component.
Adjust the text in the component.
With the text component highlighted, select
[Edit] in the vertical toolbar to make changes to the text’s font, color, weight, or spacing.
After your updates are done, select
[Send Test] to send yourself a test email.
If the test email looks good, Save your changes.
Add a new image component or highlight the image component that you want to update.
Once selected, double-click it to bring up the Select Image window. Select the Add Images to select the image that you would like to use. Once the image has loaded in the Select Image window, double-click it to add it to the new component.
Adjust the size and location of the image using the selectors in the Workspace.
After your updates are done, select
[Send Test] to send yourself a test email.
If the test email looks good, Save your changes.
Merge tags allow you to add dynamic content, like the participant’s name or amount rewarded, to the email copy. You can add a merge tag to any text component.
Select a merge tag from our merge tags list.
In the Workspace, double-click the text to which you want to add a merge tag.
Add the merge tag. Be sure to preserve the structure of the tag. It should be two "handlebar" brackets followed by the contents of the tag, followed by another two "handlebar" brackets in the opposite direction.
As an example:
{{user.firstName}}.Save your changes.
This section will walk you through the various toolbar icons accessible in the email editor.
At the top of the editor you'll find the toolbar that allows you to do the following:
Element | Description |
|---|---|
| Preview how the email renders on a desktop, tablet, or mobile screen. |
| View how the individual components of the email overlay and interact with each other. |
| Preview the email template. |
| View the underlying HTML source code for the email. You can also export email designs. |
| Preview the email with or without images. Some users choose to not load images when viewing their emails so you should ensure the email remains readable without images. |
| Undo or redo your template changes. |
| Remove all the elements from the canvas. Clearing the canvas will need to be confirmed. |
| Send a test email to an email address you specify. |
| Import your own HTML source code for the email. Note that this feature will overwrite anything you have saved into the editor. |
| Adjust the styling of the highlighted component. This includes adding classes, adjusting dimensions, text formatting and visual formatting such as borders, backgrounds and colors. |
| Adjust the settings for the highlighted component including alt text for images or IDs and titles for cells and text boxes. |
| View all of the components in their hierarchical structure starting with the top |
| View a list of new components that you can drag and drop into the workspace. You can use this to add additional text, images, links, and layout components to your email body. |
![[Delete]](https://paligoapp-cdn-eu1.s3.eu-west-1.amazonaws.com/impact/attachments/f01cdffa431a4d75ff09c130b66974d4-7282b2d90a65acafbab850259a12e0bd.svg)
![[Desktop]](https://paligoapp-cdn-eu1.s3.eu-west-1.amazonaws.com/impact/attachments/f01cdffa431a4d75ff09c130b66974d4-88c20bc6707798aa33d339257af9ac67.svg)
![[Mobile]](https://paligoapp-cdn-eu1.s3.eu-west-1.amazonaws.com/impact/attachments/f01cdffa431a4d75ff09c130b66974d4-6dafb2bcc3fb4d5b04ccb6cc205a1d98.svg)
![[Mobile]](https://paligoapp-cdn-eu1.s3.eu-west-1.amazonaws.com/impact/attachments/f01cdffa431a4d75ff09c130b66974d4-6636f342c411ccbcd50aac19c6e2de96.svg)
![[View component]](https://paligoapp-cdn-eu1.s3.eu-west-1.amazonaws.com/impact/attachments/f01cdffa431a4d75ff09c130b66974d4-32cc98d78b7ddd92efa909791a8255b6.svg)
![[Eye]](https://paligoapp-cdn-eu1.s3.eu-west-1.amazonaws.com/impact/attachments/f01cdffa431a4d75ff09c130b66974d4-7cfc9d926a5a120b4cbd70347dd52182.svg)
![[Code]](https://paligoapp-cdn-eu1.s3.eu-west-1.amazonaws.com/impact/attachments/f01cdffa431a4d75ff09c130b66974d4-5c4a4c80624c5e0445454464858bf97d.svg)
![[Remove image]](https://paligoapp-cdn-eu1.s3.eu-west-1.amazonaws.com/impact/attachments/f01cdffa431a4d75ff09c130b66974d4-a02acbba40c82024a3137376d2fec8ec.svg)
![[Undo]](https://paligoapp-cdn-eu1.s3.eu-west-1.amazonaws.com/impact/attachments/f01cdffa431a4d75ff09c130b66974d4-c092454fd883c01ee544cf5c47ce7e9f.svg)
![[Undo]](https://paligoapp-cdn-eu1.s3.eu-west-1.amazonaws.com/impact/attachments/f01cdffa431a4d75ff09c130b66974d4-2fe41978bafd74cffb51637bd1c3510a.svg)
![[Test email]](https://paligoapp-cdn-eu1.s3.eu-west-1.amazonaws.com/impact/attachments/f01cdffa431a4d75ff09c130b66974d4-09238b73ffbfa479fa3261bef4b39ea2.svg)
![[Upload].svg](https://paligoapp-cdn-eu1.s3.eu-west-1.amazonaws.com/impact/attachments/f01cdffa431a4d75ff09c130b66974d4-b29b5d8ad29643381a652b23950fe355.svg)
![[Settings]](https://paligoapp-cdn-eu1.s3.eu-west-1.amazonaws.com/impact/attachments/f01cdffa431a4d75ff09c130b66974d4-32aa3ee2fe416b90bb36d8c3deadab67.svg)
![[Layers]](https://paligoapp-cdn-eu1.s3.eu-west-1.amazonaws.com/impact/attachments/f01cdffa431a4d75ff09c130b66974d4-514b2e77f675519960615a9b3140eb3e.svg)