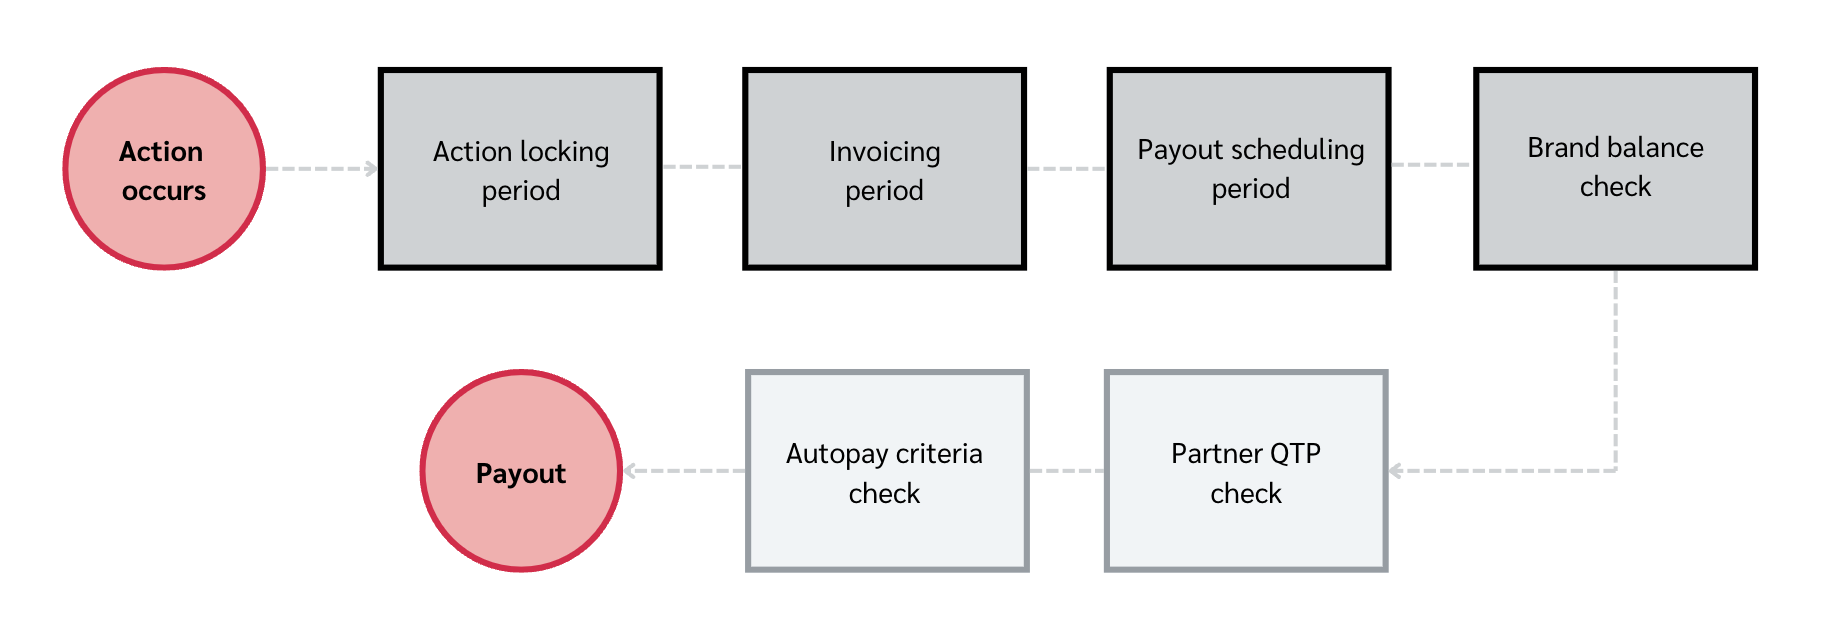
Any action (or conversion) you drive must go through a series of steps and checks before you can withdraw your commission from the impact.com platform. These steps and checks primarily serve to protect the contract made between you and your partnered brand. Your contract contains the finer details about when your commission is due to you, however, further checks take place even once your commission is due, which may delay payout in certain circumstances.

The actions you drive for a brand will initially display in your account as pending actions until a buffer period called the action locking period has passed. The action locking period allows your partnered brand to modify or reverse an action if the action is deemed outside of what was agreed in your contract.
An example of when the action may be reversed is if a customer returns the product or cancels the service that they purchased. To find your partnered brand's policy on the action locking period:
From the top navigation menu, select Discover → My Brands.
Select the brand for which you want to view the action locking period policy.
Select
[More] → View and Manage Contract.
Under Schedule, find the Action Locking period policy. It may look similar to this:

Once the action locking period passes, the brand can no longer modify or reverse the action. The invoicing period then begins.
This allows time for impact.com to deliver the brand invoices of everything they owe, after which the brand's financial team will process the invoices and initiate payments. You can expect this period to stretch over 2-3 weeks.
The payment scheduling period then begins. This period simply accommodates a brand's preferences on how soon after the action lock they propose to release payouts to partners. To find a partnered brand's policy on the payment scheduling period:
From the top navigation menu, select Discover → My Brands.
Select the brand for which you want to view the payment scheduling period policy.
Select
[More]
→ View and Manage Contract.
Under Schedule, find the Payout Scheduling period policy. It may look similar to this:

Next, impact.com checks whether the brand has sufficient funds loaded into its impact.com account to cover all due payouts. If their account is sufficiently funded, the payment will trigger automatically and be transferred to your Available Balance.
If the brand doesn't have enough funds, the payment will not be released and will be marked as Overdue. See our article on checking overdue payments for more information, or reach out to the brand directly to ask about when you'll get paid.
Payment requirements determine if your account is set up correctly to receive payouts. Complying with impact.com's payment requirement standards involves steps like completing your bank account information properly, submitting the correct tax documents, and having your supplied banking details approved by impact.com's compliance team.
For guidance on how to review and manage your bank details, tax Id, and billing address listed with impact.com, see this article.
At this point, the payment has already been disbursed to your impact.com account. The final step before your payout is withdrawn to your bank account or PayPal involves checking your Auto settings.
These settings instruct when your balance is auto-withdrawn, and you can hinge this either on a specific balance threshold being met or on a fixed day of the month being reached. To set your account's autopay criteria:
First, ensure that you have two-factor authentication set up for your account.
This step is for your safety, and you won't be able to access the following settings unless you have 2FA enabled.
From the top navigation bar, select
[User profile] → Settings.
Under the Finance section, select Bank Account.
Under Autopay, select when you want to get paid.
Note: If you make use of the Balance Threshold schedule, all payments to partners on this schedule will be processed on the following Tuesday or Thursday from the payout date. Partners using the Fixed Day schedule of the 1st or 15th will not be affected and will continue to receive withdrawals on the first viable business day from these dates.
If you select the balance threshold option, use the
[Drop-down menu] to select what value you want as the minimum that must be reached. This threshold can be as low as USD $10 or as high as USD $2,5m.
Bear in mind that this threshold will differ by currency.
If you choose the fixed day option, use the
[Drop-down menu] to select either the 1st or 15th day of the month as the day on which you'll be paid.
Bear in mind that even with this option, a minimum threshold of USD $10 applies before funds are withdrawn.

Select Save.
![[Legacy tooltip]](https://paligoapp-cdn-eu1.s3.eu-west-1.amazonaws.com/impact/attachments/f01cdffa431a4d75ff09c130b66974d4-4887b2bb2e3a3c247d937c7ed256303e.svg)