
Once you have successfully added a new event type, it is important to perform end-to-end tests to confirm that conversions are being reported to impact.com correctly. The Test Actions utility can be used to assist with this process, for a wide variety of event type integrations including website pixel (JavaScript), Conversions API, or FTP integrations. You should perform end-to-end tests of each new event type that you add.
Important: Perform testing in your staging or QA environments, then once you are ready, impact.com requires that you perform at least one end-to-end test of each new event type in your production environment. This production end-to-end test should be viewed as a final validation before the launch of a new event type.
If you are working with the impact.com onboarding team, you will receive a Technical Implementation Plan with guidelines specific to your implementation. Otherwise, the impact.com integrations portal provides guidance for many common integration methods.
Clear your browser's cache and cookies before each test and ensure that ad-blocking browser extensions are disabled.
You can run the test in your browser's private mode, incognito mode, or guest mode:
Expand for details specific to your browser.Edge Private Mode (go to File → New InPrivate Window).
Firefox Private Mode (go to File → New Private Window).
Safari Private Window (go to File → New Private Window).
Disable 3rd party cookies:
Expand for details specific to your browser.Chrome
Incognito mode will block disable 3rd party cookies by default.
Otherwise, go to Settings → Privacy and Security → Third-party cookies and select Block third-party cookies.
Edge
Select
![[Menu]](https://paligoapp-cdn-eu1.s3.eu-west-1.amazonaws.com/impact/attachments/f01cdffa431a4d75ff09c130b66974d4-d3b5cc4952c19da1607fade39f63066b.svg) [Menu] → Settings.
[Menu] → Settings.Select Cookies and Data stored.
Drill into “Cookies and Site Data” and toggle on Block third-party cookies.
This process is required using both InPrivate and normal browser windows in Edge.
Firefox
Select
![[Hamburg menu]](https://paligoapp-cdn-eu1.s3.eu-west-1.amazonaws.com/impact/attachments/f01cdffa431a4d75ff09c130b66974d4-ccad3105b14cfd089a0d7603c57d0595.svg) [Menu] → Settings → Privacy & Security.
[Menu] → Settings → Privacy & Security.Under Enhanced Tracking Protection, select Custom.
Select Cookies and All third-party cookies.
This process is required using both private and normal browser windows in Firefox.
Safari
Safari already blocks all third-party cookies.
From the top navigation bar, select
![[User]](https://paligoapp-cdn-eu1.s3.eu-west-1.amazonaws.com/impact/attachments/f01cdffa431a4d75ff09c130b66974d4-ec4c7b9aa5792fe725406b280fb272b1.svg) [User profile] → Settings.
[User profile] → Settings. On the right, under Tracking, select Event Types.
Hover your cursor over the event type you want to test, select
![[More] vNext](https://paligoapp-cdn-eu1.s3.eu-west-1.amazonaws.com/impact/attachments/f01cdffa431a4d75ff09c130b66974d4-73f43076a692f2dcc8960037fabdca9c.svg) [More] → Test.
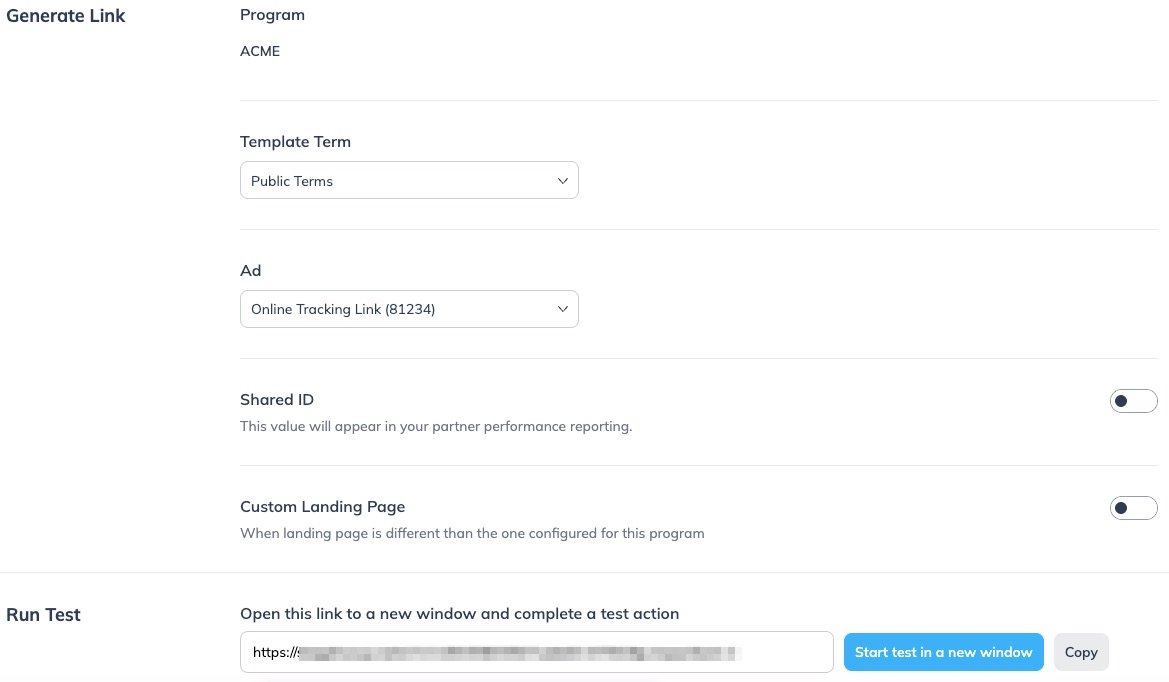
[More] → Test.Select the Template Term, Ad and optionally, change the Landing Page URL. All event type tests will use your program's default landing page unless otherwise specified.
Select Start Test in New Window. A new browser tab will open, which will immediately direct to the URL chosen in Step 4 above.
Complete a test conversion on your website, in the same browser and in the same session as the one you used to select Start Test in New Window. Record the Order ID and payload parameters (i.e., product details, discount, price, etc.).
For Sale transactions, complete several tests with multiple SKUs, with a minimum quantity of 2 for each SKU, and some tests with a promo code and discount and some without a promo code and discount.
For Lead transactions, complete several transactions to test variations in payload parameters such as promo codes, notes, or text fields, that are relevant to your expected payout conditions.
Log in to your impact.com user account.
Retrieve the tracked conversion payload details by following these steps:
From the left navigation bar, select
![[Optimize] v2](https://paligoapp-cdn-eu1.s3.eu-west-1.amazonaws.com/impact/attachments/f01cdffa431a4d75ff09c130b66974d4-1d8013c97bf236aaca056d801ce35308.svg) Engage → Transactions → Test Actions.
Engage → Transactions → Test Actions.Find your test conversion(s) based on the Order Id you recorded above.
Hover your cursor over the transaction and select
[More] → See Details.
Review the conversion payload details paying attention to revenue, discounts, product details, and any other element that will potentially affect partner payouts.
If all the details are as expected, select Approve. Congratulations! Your event type is validated and successfully integrated.
If any details are not correct, select Reject. If you reject the end-to-end test result, you will need to correct the integration and repeat the end-to-end process for that conversion event until you achieve a successful result.
It may take up to 30 minutes for a test transaction to surface on the Test Actions screen. If your test transaction does not appear on the test transaction screen, contact your Implementation Engineer, or support.