> For the complete documentation index, see [llms.txt](https://help.impact.com/llms.txt). Markdown versions of documentation pages are available by appending `.md` to page URLs; this page is available as [Markdown](https://help.impact.com/partner/de/was-mochten-sie-lernen/platform-features/tracking/tracking-links/create-and-manage-links/chrome-extension/create-tracking-links-via-the-chrome-extension.md).
# Tracking-Links über die Chrome-Erweiterung erstellen
Sobald du [die Chrome-Erweiterung von impact.com eingerichtet hast](https://help.impact.com/partner/de/was-mochten-sie-lernen/platform-features/tracking/tracking-links/create-and-manage-links/chrome-extension/impactcom-for-chrome-extension-overview.md), kannst du Tracking-Links für Marken erstellen, mit denen [du zusammenarbeitest](https://help.impact.com/partner/de/was-mochten-sie-lernen/platform-features/working-with-brands/applying-to-brands/find-and-apply-to-brands.md). Du kannst auch [die Einstellungen deiner Chrome-Erweiterung verwalten](https://help.impact.com/partner/de/was-mochten-sie-lernen/platform-features/tracking/tracking-links/create-and-manage-links/chrome-extension/manage-your-chrome-extension-settings.md).
{% stepper %}
{% step %}
## Wähle ein Produkt aus, das du bewerben möchtest
Der Einstieg ist auf zwei Arten möglich:
{% tabs %}
{% tab title="Auf der Produktseite" %}
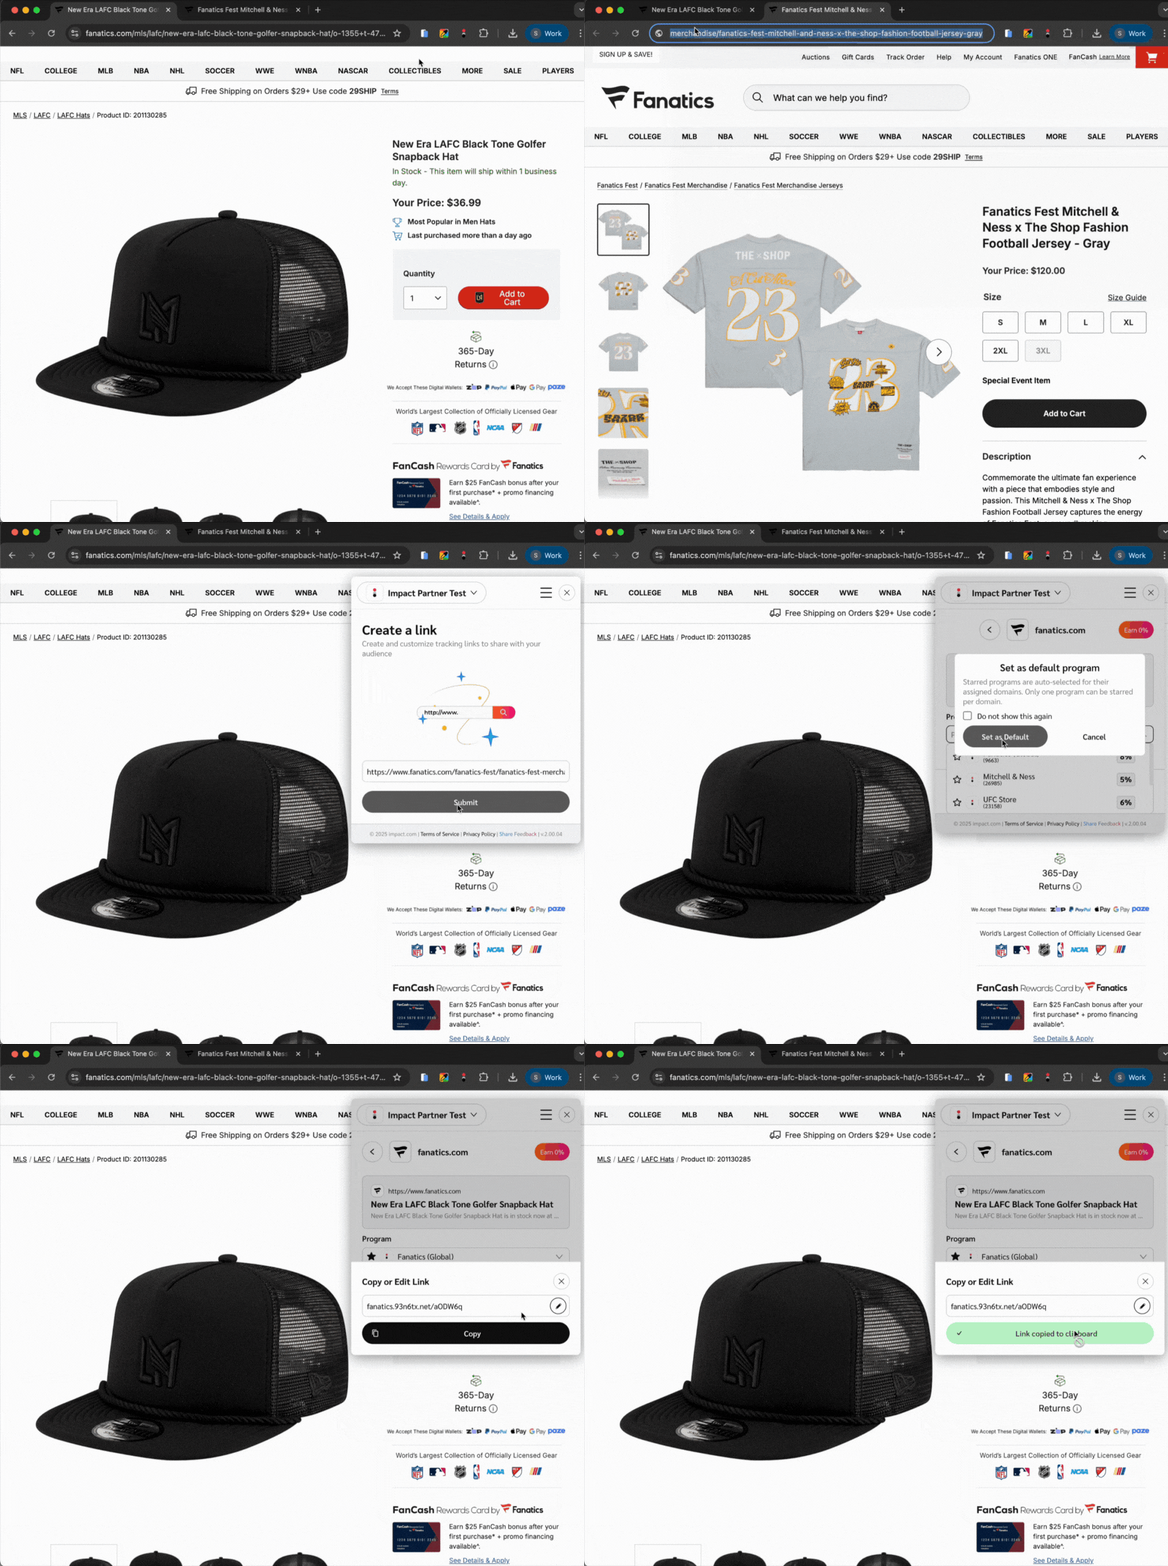
Mit der Erweiterung kannst du auf jeder Produktseite Tracking-Links erstellen.
1. Rufe die Produktseite auf, die du bewerben möchtest.
* Je nach deinen [Benachrichtigungseinstellungen](https://help.impact.com/partner/de/was-mochten-sie-lernen/platform-features/tracking/tracking-links/create-and-manage-links/chrome-extension/manage-your-chrome-extension-settings.md#set-notifications-for-earning-opportunities)wird möglicherweise oben rechts ein Pop-up angezeigt, wenn die Website-Domain einer Domain auf der impact.com-Plattform entspricht, für die du berechtigt bist, einen Link zu erstellen.
* Alternativ kannst du oben rechts im Browserbereich das  **\[impact.com-Logo]**.
{% endtab %}
{% tab title="Du hast bereits eine Produkt-URL" %}
Wenn du bereits eine URL zu einer Produktseite hast, kannst du sie in deine Erweiterung einfügen, um Tracking-Links zu erstellen.
1. Wähle auf einer beliebigen Webseite oben rechts im Browserbereich das **\[impact.com-Logo].**
* Wenn das Feld *URL einfügen* nicht angezeigt wird, wähle  **\[Zurück]**.
2. Füge den Produktlink in das Feld *URL einfügen* ein und wähle **Senden**.
{% endtab %}
{% endtabs %}
{% hint style="warning" %}
**Warnung**: Die Erweiterung hält dich davon ab, fortzufahren, wenn die Produktseite oder URL bereits Tracking-Informationen enthält, zum Beispiel wenn du die Seite über einen vorhandenen Tracking-Link aufgerufen hast. Ein aus dieser URL erstellter Link schreibt dir möglicherweise keine von dir erzielten Verkäufe gut. Schließe die Nachricht und beginne erneut mit der ursprünglichen Produktseitenadresse der Marke.
{% endhint %}
{% endstep %}
{% step %}
## Wähle dein Programm aus
1. Wähle eines der Programme der Marke im **Programm**  **\[Dropdown-Menü]**.
* Wenn dir hier mehrere Programmoptionen zur Verfügung stehen, kannst du  **\[Stern] → Als Standard festlegen** auswählen, damit beim zukünftigen Besuch der Markenseite automatisch ein bestimmtes Programm ausgewählt wird.
2. Optional kannst du Tracking-Links für Kampagnen und Aufgaben erstellen, indem du eine Kampagne auswählst. Diese Option ist nur verfügbar, wenn du an aktiven Kampagnen teilnimmst.
* Verwende im Abschnitt *Aufgabe* das  **\[Dropdown-Menü]** um die Aufgabe auszuwählen, der dieser Link zugeordnet werden soll.
{% endstep %}
{% step %}
## Berichtsparameter hinzufügen
1. Um deinem Tracking-Link Berichtsparameter hinzuzufügen, wähle **Erweitert**  **\[Erweitern]**.
* Lege deine Parameter für [Sub-ID und Shared-ID](https://help.impact.com/partner/de/was-mochten-sie-lernen/platform-features/tracking/tracking-links/link-parameters/sub-id-and-shared-id-parameters-explained-for-partners.md).
* Wenn du den Link auf einer bestimmten Medieneigenschaft teilen möchtest, wähle die passende Option im **Medieneigenschaft**  **\[Dropdown-Menü]**aus. So kannst du in Berichten leicht erkennen, welche Medieneigenschaft für den Traffic über den Link verantwortlich war.
* Wenn dir hier mehrere Medieneigenschaften zur Auswahl stehen, kannst du  **\[Stern] → Als Standard festlegen** um beim künftigen Besuch der Markenseite automatisch eine bestimmte Eigenschaft auszuwählen.
{% endstep %}
{% step %}
## Link erstellen
1. Auswählen **Link erstellen**.
* Du kannst einen [Vanity-Link](https://help.impact.com/partner/de/was-mochten-sie-lernen/platform-features/tracking/tracking-links/create-and-manage-links/create-manage-vanity-link.md) erstellen, indem du  **\[Bearbeiten]** auswählst und den Slug bearbeitest (den Text nach dem Schrägstrich). Wähle  **\[Bestätigen]** aus, um deine Änderungen zu speichern, oder wähle  **\[Beenden]** aus, um den Bearbeitungsmodus zu verlassen.
2. Sobald dein Link erstellt ist, wähle  **\[Kopieren]** und teile deinen Link mit deiner Zielgruppe.
{% endstep %}
{% endstepper %}
---
# Agent Instructions
This documentation is published with GitBook. GitBook is the documentation platform designed so that both humans and AI agents can read, navigate, and reason over technical content effectively. Learn more at gitbook.com.
## Querying This Documentation
If you need additional information that is not directly available in this page, you can query the documentation by asking a question.
Perform an HTTP GET request on the following URL with the `ask` and `goal` query parameters:
```
GET https://help.impact.com/partner/de/was-mochten-sie-lernen/platform-features/tracking/tracking-links/create-and-manage-links/chrome-extension/create-tracking-links-via-the-chrome-extension.md?ask=&goal=
```
`ask` is the immediate question: it should be specific, self-contained, and written in natural language.
`goal` is what the user is ultimately trying to achieve, the reason they need the answer. Sharing it helps GitBook give you a better, more relevant answer. A goal is most helpful when it describes the outcome the user wants rather than restating the question. For example, with `ask=how do I create an API token`, a goal like `automate deployments from our CI pipeline` lets GitBook tailor the answer to that use case.
The response will contain a direct answer to the question and relevant excerpts and sources from the documentation.
Use this mechanism when the answer is not explicitly present in the current page, you need clarification or additional context, or you want to retrieve related documentation sections.