> For the complete documentation index, see [llms.txt](https://help.impact.com/llms.txt). Markdown versions of documentation pages are available by appending `.md` to page URLs; this page is available as [Markdown](https://help.impact.com/brand/ja/what-would-you-like-to-learn-about/platform-features/review-partner-applications/automate-partner-application-processing/set-up-a-workflows-reject-message.md).
# ワークフローの却下メッセージを設定する
PXAコースを受講する
パートナーのプログラムへの申請は、以下で設定した拒否メッセージを使って却下できます。 [ワークフロー](/brand/ja/what-would-you-like-to-learn-about/platform-features/review-partner-applications/automate-partner-application-processing/create-workflows-to-automatically-process-partner-applications.md)。このメッセージは、パートナーが申請が却下された理由や、問題を修正する方法、そして再申請の可能性を理解する助けになります。
#### ワークフローの拒否メッセージを設定する
1. 左側のナビゲーションメニューで、次を選択します  **\[Engage] → パートナー → 自動化 →** [Workflows](https://app.impact.com/secure/advertiser/engage/fr/ps-bar-ui.ihtml).
2. 選択してください **ワークフローを作成** を画面右上でクリックします。
* または、更新したい既存のワークフローを見つけてカーソルを合わせ、次を選択します **編集**.
* 必須項目を入力してください。 [ワークフローフォームのリファレンス](/brand/ja/what-would-you-like-to-learn-about/platform-features/review-partner-applications/automate-partner-application-processing/create-workflows-to-automatically-process-partner-applications.md#create-a-workflow-0-0) をさらに参照してください。
3. の *アクションタイプ* セクションでは、次を使用します  **\[ドロップダウンメニュー]** を使って選択します **申請を処理** および **却下**.
* メッセージボックスが表示され、パートナーに送信されるカスタム拒否メッセージを入力できます。
* 文字数制限は255文字です。
4. ワークフローの作成が完了したら、次を選択します **作成** または **保存**.
#### プログラム固有の拒否メールを更新する
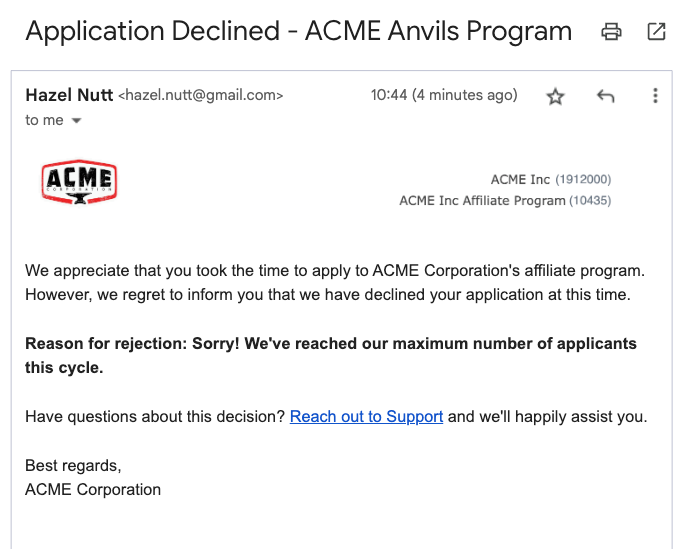
カスタムのプログラム固有拒否メールを使用している場合は、メール本文に次を含めるよう更新する必要があります `{rejectReason}` トークン。これにより、カスタムのワークフロー拒否メッセージが拒否メールに含まれるようになります。
1. 上部ナビゲーションバーから、次を選択します  **\[ユーザープロフィール] → 設定**.
2. 右側の *ブランド設定*の下で、次を選択します **システムメールとUIメッセージ**.
3. 〜へ移動します *拒否メール* フィールドで、次を選択します  **\[編集]**.
4. 選択してください  **\[ラジオボタン]** **プログラム固有の拒否メールを送信**.
5. の *件名* フィールドに、メールのカスタム件名を入力します。
6. の *HTMLメール本文* フィールドに、必要なHTMLコードを含めたカスタマイズ済みのメールメッセージを入力します。
* テキストに特別なタグを追加すると、メール生成時に動的に置き換えられます。
* 拒否メッセージを設定する際は、必ず次のタグを含めてください **`{rejectReason}`**.
7. 選択してください **保存**.
メールの例
{% hint style="info" %}
**注:** 他のシステム生成の拒否理由も拒否メールに表示される場合があります。たとえば、Impact AI による拒否、停止、またはブロックリストへの登録などです。
{% endhint %}
---
# Agent Instructions
This documentation is published with GitBook. GitBook is the documentation platform designed so that both humans and AI agents can read, navigate, and reason over technical content effectively. Learn more at gitbook.com.
## Querying This Documentation
If you need additional information that is not directly available in this page, you can query the documentation by asking a question.
Perform an HTTP GET request on the following URL with the `ask` and `goal` query parameters:
```
GET https://help.impact.com/brand/ja/what-would-you-like-to-learn-about/platform-features/review-partner-applications/automate-partner-application-processing/set-up-a-workflows-reject-message.md?ask=&goal=
```
`ask` is the immediate question: it should be specific, self-contained, and written in natural language.
`goal` is what the user is ultimately trying to achieve, the reason they need the answer. Sharing it helps GitBook give you a better, more relevant answer. A goal is most helpful when it describes the outcome the user wants rather than restating the question. For example, with `ask=how do I create an API token`, a goal like `automate deployments from our CI pipeline` lets GitBook tailor the answer to that use case.
The response will contain a direct answer to the question and relevant excerpts and sources from the documentation.
Use this mechanism when the answer is not explicitly present in the current page, you need clarification or additional context, or you want to retrieve related documentation sections.

.png?alt=media&token=4c2ab257-156a-4a38-a320-ca8fc4c3217d)