> For the complete documentation index, see [llms.txt](https://help.impact.com/llms.txt). Markdown versions of documentation pages are available by appending `.md` to page URLs; this page is available as [Markdown](https://help.impact.com/brand/ja/what-would-you-like-to-learn-about/beta-product-boost/beta-product-boost-for-retailers/get-started-with-retail-media-as-a-retailer.md).

# 小売業者としてリテールメディアを始める

Product Boostキャンペーンを作成し、ベンダーから資金提供を受けるには、まずRetail Mediaに参加登録し、プラットフォーム内でベンダーと接続する必要があります。

{% stepper %}
{% step %}

#### ステップ1：Retail Mediaに参加登録する

{% hint style="info" %}
**近日公開：** この機能は近日公開予定です。今のところ、 [サポート](https://app.impact.com/support/portal.ihtml) までご連絡のうえ、Retail Mediaへのアクセスを取得してください。
{% endhint %}

参加登録すると：

* 作成したProduct Boostキャンペーンの拡張レポートに、あなたとベンダーがアクセスできるようになります。
* ベンダーがキャンペーンに資金を提供できるようになり、請求処理をimpact.comプラットフォーム内または外部で行えるようになります。

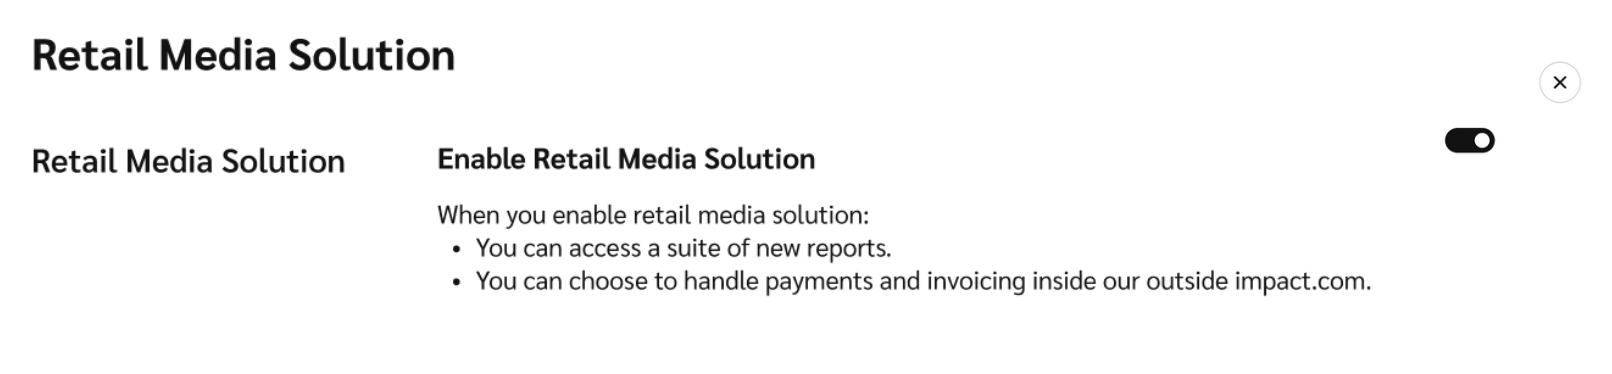
有効にするには：

1. 上部のナビゲーションバーから ![](https://1458456015-files.gitbook.io/~/files/v0/b/gitbook-x-prod.appspot.com/o/spaces%2FwMLlMoFBtKJa8ptd3zaw%2Fuploads%2F210dEQa93qyQgoJDkieL%2FUser%20profile.svg?alt=media\&token=f84c5b17-fae4-4a30-990a-9de5e57a150b) **\[ユーザープロフィール] → 設定**.
2. 左側の列の *全般*、次を選択します **Retail Mediaソリューション**.
3. ![](https://1458456015-files.gitbook.io/~/files/v0/b/gitbook-x-prod.appspot.com/o/spaces%2FwMLlMoFBtKJa8ptd3zaw%2Fuploads%2FiZjM1xY8o3v1iR3Zaysd%2FToggle.svg?alt=media\&token=b1550d48-bba9-4e81-8604-bc12370c5caa) **\[オンに切り替え] Retail Mediaソリューションを有効化**.

<div data-with-frame="true"><figure><img src="https://1458456015-files.gitbook.io/~/files/v0/b/gitbook-x-prod.appspot.com/o/spaces%2FwMLlMoFBtKJa8ptd3zaw%2Fuploads%2Fgit-blob-68da224771d59435e2f2e684e1fce54072784bd1%2F92bde0a1cbee732e88fcbf370547b3de7c2817d6866ad08fb0a1a5ce4b944adc.png?alt=media" alt=""><figcaption></figcaption></figure></div>
{% endstep %}

{% step %}

#### ステップ2：登録済みベンダーを表示する

参加登録後は、左側のナビゲーションバーから *ベンダー* 画面に移動できるようになります。

1. 左側のナビゲーションバーから、次を選択します ![](https://1458456015-files.gitbook.io/~/files/v0/b/gitbook-x-prod.appspot.com/o/spaces%2FwMLlMoFBtKJa8ptd3zaw%2Fuploads%2Fgit-blob-230534471fef5f40808e921e41ee44e4a06ded03%2Fe6cb9548999afdc1ed3ce4942e4cb5b45b5cecbd323267aac2a7cd1915fccc09.svg?alt=media) **\[Engage] → ベンダー → マイベンダー**.
   1. この画面には、impact.comが商品カタログから自動的に事前追加したベンダーの一覧が表示されます。これらは、あなたのプラットフォームで販売される商品を供給するベンダーです。
   2. この画面を初めて表示すると、すべてのベンダーのステータスは ![](https://1458456015-files.gitbook.io/~/files/v0/b/gitbook-x-prod.appspot.com/o/spaces%2FwMLlMoFBtKJa8ptd3zaw%2Fuploads%2Fgit-blob-e1a253435424ca70313cf1ccd4c2b32538f7cb4f%2Fe7e0e291b7b3064adf75460fdae7962f3ab671720c43f66e336c482910a03564.svg?alt=media) **\[未接続]**.

<div data-with-frame="true"><figure><img src="https://1458456015-files.gitbook.io/~/files/v0/b/gitbook-x-prod.appspot.com/o/spaces%2FwMLlMoFBtKJa8ptd3zaw%2Fuploads%2F2qhs2Gka38zGzVpVXY0X%2FScreenshot%202026-05-20%20at%2012.09.07.png?alt=media&amp;token=85904dc1-f109-45d5-a521-44fc00a1e979" alt=""><figcaption></figcaption></figure></div>
{% endstep %}

{% step %}

#### ステップ3：ベンダーと接続する

Product Boostキャンペーンでベンダーとの協業を開始するには、接続を招待してください。

<details>

<summary>登録済みベンダーと接続する</summary>

すでにあなたの *マイベンダー* 画面から設定できます。

1. 接続したいベンダーにカーソルを合わせて、次を選択します。 **招待**.
2. スライドアウトで、次の項目を入力します：

   | 項目    | 説明                                                               |
   | ----- | ---------------------------------------------------------------- |
   | ベンダー名 | これはベンダーブランドの名前です。                                                |
   | 担当者名  | 連絡したいベンダーの担当者名を入力します。例： *Pepper Potts*.                          |
   | メール   | 招待を送信するメールアドレスを入力します。例：<pepper@starktech.com>。                   |
   | メッセージ | 任意のメモとして、協業が相互にどのようなメリットをもたらすかを説明してください。このメッセージは招待メールの本文に表示されます。 |
3. 選択 **招待**.
   * ベンダーのステータスは ![](https://1458456015-files.gitbook.io/~/files/v0/b/gitbook-x-prod.appspot.com/o/spaces%2FwMLlMoFBtKJa8ptd3zaw%2Fuploads%2Fgit-blob-59d773436546177e5ed4c8f322de1961747ce787%2Fd966c4791c75ecab8d11e9cece49f8b810ecbfdfad31a81300ec1021aa8b3460.svg?alt=media) **\[招待済み]**&#x306B;更新され、招待がメールで送信されたことを示します。ベンダーが承認すると、ステータスは ![](https://1458456015-files.gitbook.io/~/files/v0/b/gitbook-x-prod.appspot.com/o/spaces%2FwMLlMoFBtKJa8ptd3zaw%2Fuploads%2Fgit-blob-3cf3c05ed3805d25beec58d032bb013b22d5d33d%2F15c44d5f4ea08ada8bd67240c1006604f768638ba1169cc3d1d435fd8c73a9c5.svg?alt=media) **\[接続済み]**.

</details>

<details>

<summary>登録されていないベンダーと接続する</summary>

あなたの *マイベンダー* 画面に登録されていないベンダーを追加し、接続を招待します。

1. 右上隅で、次を選択します **ベンダーを追加**.
2. スライドアウトで、次の項目を入力します：

   | 項目    | 説明                                                                                                                                                                                                                                                                      |
   | ----- | ----------------------------------------------------------------------------------------------------------------------------------------------------------------------------------------------------------------------------------------------------------------------- |
   | ベンダー名 | 必要に応じて、ドロップダウンメニューからベンダーのRetail Mediaプログラム名を検索して選択します。Retail Mediaプログラム名がわからない場合は、空欄のままにしてください。                                                                                                                                                                         |
   | 招待を送信 | ![](https://1458456015-files.gitbook.io/~/files/v0/b/gitbook-x-prod.appspot.com/o/spaces%2FwMLlMoFBtKJa8ptd3zaw%2Fuploads%2FiZjM1xY8o3v1iR3Zaysd%2FToggle.svg?alt=media\&token=b1550d48-bba9-4e81-8604-bc12370c5caa) **［オンに切り替え］** ベンダーが接続リクエストを受け取れるように、この設定を確認してください。 |
   | 担当者名  | 連絡したいベンダーの担当者名を入力します。例： *Pepper Potts*.                                                                                                                                                                                                                                 |
   | メール   | 招待を送信するメールアドレスを入力します。例： *<pepper@starktech.com>*.                                                                                                                                                                                                                       |
   | メッセージ | 任意のメモとして、協業が相互にどのようなメリットをもたらすかを説明してください。このメッセージは招待メールの本文に表示されます。                                                                                                                                                                                                        |
3. 選択 **追加して招待**.
   * ベンダーがあなたの *マイベンダー* 画面に表示され、 ![](https://1458456015-files.gitbook.io/~/files/v0/b/gitbook-x-prod.appspot.com/o/spaces%2FwMLlMoFBtKJa8ptd3zaw%2Fuploads%2Fgit-blob-59d773436546177e5ed4c8f322de1961747ce787%2Fd966c4791c75ecab8d11e9cece49f8b810ecbfdfad31a81300ec1021aa8b3460.svg?alt=media) **\[招待済み]** ステータスが付いているはずです。これは、招待がメールで送信されたことを示します。ベンダーが承認すると、ステータスは ![](https://1458456015-files.gitbook.io/~/files/v0/b/gitbook-x-prod.appspot.com/o/spaces%2FwMLlMoFBtKJa8ptd3zaw%2Fuploads%2Fgit-blob-3cf3c05ed3805d25beec58d032bb013b22d5d33d%2F15c44d5f4ea08ada8bd67240c1006604f768638ba1169cc3d1d435fd8c73a9c5.svg?alt=media) **\[接続済み]**.

</details>
{% endstep %}
{% endstepper %}

これで、 [Product Boostキャンペーンを作成し](/brand/ja/what-would-you-like-to-learn-about/beta-product-boost/product-boost-campaign-management/create-a-product-boost-campaign.md) 、接続済みベンダーに資金提供を依頼する準備が整いました。


---

# Agent Instructions
This documentation is published with GitBook. GitBook is the documentation platform designed so that both humans and AI agents can read, navigate, and reason over technical content effectively. Learn more at gitbook.com.

## Querying This Documentation
If you need additional information that is not directly available in this page, you can query the documentation dynamically by asking a question.

Perform an HTTP GET request on the current page URL with the `ask` query parameter, and the optional `goal` query parameter:

```
GET https://help.impact.com/brand/ja/what-would-you-like-to-learn-about/beta-product-boost/beta-product-boost-for-retailers/get-started-with-retail-media-as-a-retailer.md?ask=<question>&goal=<endgoal>
```

`ask` is the immediate question: it should be specific, self-contained, and written in natural language.
`goal` is optional and describes the broader end goal you are ultimately trying to accomplish on behalf of the user. GitBook uses it to tailor the answer towards what is most useful for that goal.

The response will contain a direct answer to the question and relevant excerpts and sources from the documentation.

Use this mechanism when the answer is not explicitly present in the current page, you need clarification or additional context, or you want to retrieve related documentation sections.